To build a sustainable pipeline for vertical video, you must stop treating production as an afternoon art project. Successful batch content creation requires turning your creative output into a predictable, mechanical assembly line.
If you sit down at your desk intending to brainstorm, write, record, and edit a single short-form clip from scratch every single day, you will fail by day nine. Your creative energy will dry up, your audio quality will vary across your feed, and you will eventually abandon the channel out of sheer operational exhaustion.
This guide outlines the precise system we used in our studio to write, film, and assemble 30 high-retention vertical videos in exactly 7 hours and 15 minutes. This structural model strips away the emotional friction of content creation by separating the act of deep strategic thinking from the act of physical execution.
By building a rigid, multi-stage production funnel, you can generate an entire month of competitive short-form assets in a single dedicated session.
Why Use For This
Batch content creation works because context switching destroys human efficiency. When you jump from strategic scriptwriting to setting up camera tripods, and then immediately turn around to micro-adjust timeline audio levels, your brain pays a massive cognitive transition penalty.
You waste valuable time adjusting lighting gear, finding clear audio files, and re-learning your software layout every single day.
In short-form vertical video apps like TikTok, YouTube Shorts, and Instagram Reels, production consistency is your primary leverage. The algorithms used by these platforms require data to find your core target audience, meaning irregular publishing schedules limit your channel growth.
When you record your videos in a single bulk session, your visual framing, environmental lighting, and spoken audio levels stay completely identical across your assets. This structural uniformness gives your channel feed an immediate, professional brand identity that manual daily production simply cannot match.
The core trade-off of this system is its inherent rigidity. When you lock in 30 days of vertical video assets on a single Monday morning, you lose the ability to instantly jump on sudden, daily news trends or fleeting pop-culture music formats.
If your market requires you to react to shifting news within hours, full month-long batch content creation will pull you out of the cultural conversation. However, for educational channels, B2B marketing pipelines, and foundational skill development, systemic consistency beats chasing temporary viral trends every single time.
Setup Guide
Before you click record on your camera or open a script template, your physical and digital working environments must be completely locked down. Trying to fix broken hardware settings or track down missing software assets mid-session will destroy your operational rhythm and derail the entire day.
+-----------------------------------------------------------------+
|                    PRE-PRODUCTION CHECKLIST                     |
+-----------------------------------------------------------------+
| [ ] Camera Workspace Fixed & Marked (Tape lines on floor)       |
| [ ] Primary & Backup Storage Cleared (Min. 128GB raw space)     |
| [ ] Audio Assets Pre-Cleared (3 Master tracks downloaded)       |
| [ ] 3 Distinct Wardrobe Layers Pressed & Staged at Desk         |
| [ ] Multi-Row Production Tracker Spreadsheet Initialized        |
+-----------------------------------------------------------------+
|               BATCH SCRIPTING MATRIX (30 VIDEOS)                |
+-----------------------------------------------------------------+
| Pillar 1: Mechanics  --> 8 Videos (Deep technical breakdowns)    |
| Pillar 2: Case Studies --> 8 Videos (Deconstructed real examples)|
| Pillar 3: Tool Stack   --> 7 Videos (Workflow efficiency reviews)|
| Pillar 4: Mistakes     --> 7 Videos (Friction point post-mortems)|
+-----------------------------------------------------------------+
1. Hardware Calibration
Set your recording camera to 4K resolution at 24 frames per second or 30 frames per second. Do not shoot your raw footage in 1080p; you need the extra pixel density to crop, reframe, or punch in on your face during post-production without losing crisp image clarity.
Fix your main tripod position and place strips of colored tape on the floor around the legs so your framing stays identical if the unit gets bumped. Set your external microphone gain manually so your voice peaks cleanly at -6dB, which prevents digital clipping while leaving enough audio headroom for background music tracks later.
2. File Architecture and Pre-Sets
Create a master project folder structure on your local drive named with the year and current month. Inside it, build three separate sub-directories: 01_Raw_Footage, 02_Audio_Assets, and 03_Final_Exports. Download three distinct, royalty-free background instrumental tracks ahead of time and drop them directly into your audio folder. Pre-configuring these static digital directories prevents you from hunting through messy download folders when you are deep in the final editing phase.
3. Wardrobe Staging
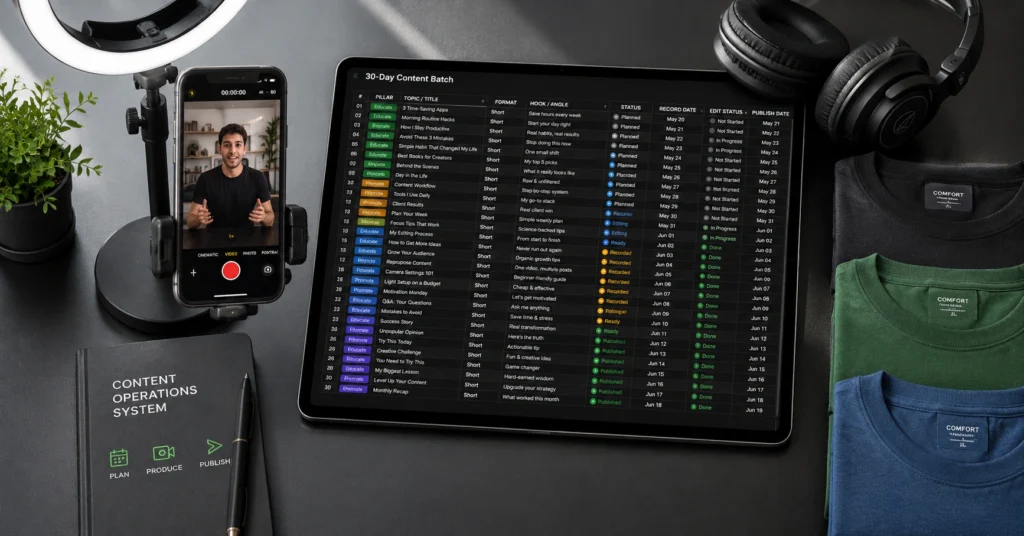
Gather three separate shirts, jackets, or layers and hang them next to your recording station. You will change your top layer after every block of eight videos. This small adjustment breaks up the visual monotony of your profile grid, ensuring that a viewer scrolling your page sees a dynamic, varied timeline rather than looking like you recorded your entire channel in a single afternoon.
Workflow
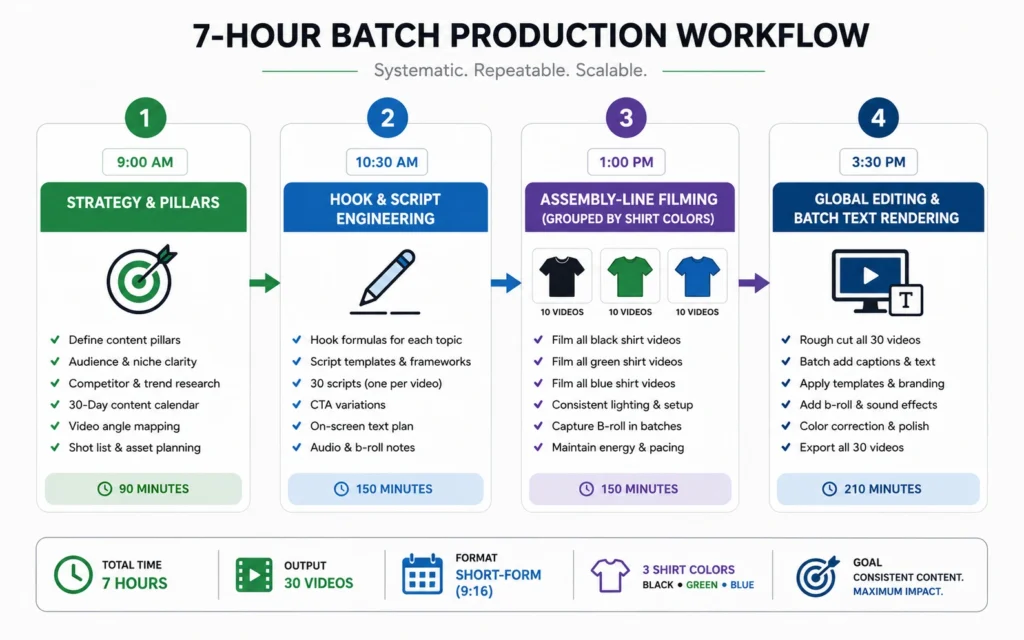
This step-by-step assembly manual turns abstract content concepts into 30 finished, platform-ready export files. Follow these steps in exact chronological order without overlapping the distinct phases.
Step 1: Map the Concept Architecture
Do not approach your brainstorming session with a blank page. Break your month down into exactly four core conceptual pillars that reflect your primary professional expertise. For example, a channel dedicated to growth marketing would deploy four distinct buckets: Data Analytics, Landing Page Design, Copywriting Frameworks, and Ad Account Structure. Assign exactly seven to eight individual video topics to each pillar to hit your 30-video target.
This structural breakdown guarantees your month of content remains balanced and structurally cohesive, rather than leaning heavily on one easy topic while ignoring your channel’s primary value proposition.
Step 2: Build the Hook Matrix
The first three seconds of a short-form vertical video dictate its entire performance. Write your 30 video hooks before you draft a single line of supporting context. Use proven structural openers that promise immediate utility or challenge an industry norm, such as “This is the exact layout behind a $10k landing page” or “Stop formatting your spreadsheets like this.” By separating your hook design from the body text, you ensure every single asset is engineered for viewer retention before you invest time writing the deeper technical analysis.
Step 3: Write Modular, Zero-Filler Scripts
Draft your script bodies using a strict, concise bullet-point model rather than long essays. Each video must focus entirely on solving one singular problem, containing a maximum of 120 words to fit safely inside a 45-to-60-second runtime.
Use the content creation framework to keep your insights direct and punchy. Write out the exact transitions and visual changes you want to make, using explicit markers like [PUNCH IN] or [SHOW SCREENSHOT] directly inside the text lines. This clear labeling gives you scannable directions to follow when you transition into filming and editing.
Step 4: Execute the Batch Filming Session
Switch your brain completely into delivery mode. Do not read your scripts directly from a distant wall monitor; look straight into the camera lens to build authority with your viewers. Read one distinct bullet point from your script, look directly at the center of the glass lens, deliver the line clearly, and then pause for one full second of silence. Repeat this exact process for every single line of text.
This intentional pausing creates clean, obvious gaps in your raw audio wave, making it easy to identify cuts and slice out mistakes during post-production. Change your top layer of clothing after every group of eight videos to keep your feed looking fresh.
Step 5: Run the Assembly-Line Edit
Import your raw files into your desktop editing timeline. Drop your pre-selected master audio tracks onto the bottom tracks and set their volume down to a quiet -22dB. Slice out every silent pause, breath, and verbal stumble across all 30 clips before adding a single piece of text.
Once your base timeline is cut tight, apply a single global color grade and a uniform caption text style across all files. Processing your clips in large, single-action blocks allows you to finish your editing work in a fraction of the time it takes to produce individual videos sequentially.
Pro Tips
- Edit by Action, Not by Clip: Never edit a single short-form video from start to finish before moving to the next one. Slice the rough pauses out of all 30 clips first, then add text graphics to all 30 clips, and finally apply your audio leveling. Working in uniform task blocks keeps your mind focused and speeds up your editing turnaround.
- The Three-Line Script Safe-Zone: Keep your text captions inside the center 60% of your video screen. Putting your text overlays too close to the bottom or right side means they will get covered up by account usernames, long video descriptions, and platform engagement icons.
- Keep a Master Outtake Track: Do not delete your recording mistakes or funny verbal stumbles during your editing cuts. Drag those messy clips into a separate folder at the bottom of your project timeline. These quick outtakes make highly engaging, relatable update clips for your community stories later in the month.
- Decouple Texting from Editing: Type out all of your video titles, descriptions, and metadata tags directly inside a centralized spreadsheet while your video files render out. Having all your text lines organized in one document means you can simply copy and paste them when uploading, preventing manual typing errors on your phone.
Frequently Asked Questions About Batch Content Creation
How do you avoid looking identical in every short-form video when recording in bulk?
Keep three shirts or layers at your desk and swap them between recording blocks. Change your camera angle or focal distance twice during the session. These adjustments disrupt the visual monotony across a social feed without slowing down your production speed.
What should you do if your batch-created short-form video scripts feel forced or robotic?
Write your scripts exactly how you speak by recording your initial ideas as voice memos first. Transcribe those memos and use them as your script baseline. This strategy preserves natural inflections and prevents the clinical, artificial tone that often ruins written scripts.
Is it better to batch edit on a mobile app or a desktop workstation?
Use a desktop non-linear editor for bulk production assets. Mobile applications excel at single-clip adjustments but fall short during high-volume workflows. Desktop platforms let you apply global master styles, keyboard shortcuts, and nested adjustment layers across 30 clips concurrently.
How do you handle sudden platform updates or algorithm shifts when your content is pre-made?
Leave four open slots in your monthly publishing calendar for spontaneous uploads. Use your batch-created videos as your reliable baseline content schedule, and drop in timely updates whenever your market shifts. This approach gives you the security of a full pipeline without losing your ability to move fast when news breaks.
Related Resources
To further optimize your content pipeline and expand your digital reach, explore our detailed systems for tracking performance metrics and building scalable written channels:
- Short-Form Video Tracking Systems: Learn how to interpret retention analytics and watch-time graphs to optimize your next production batch.
- Sustainable Blogging Frameworks: Discover how to turn your high-performing short-form video scripts into detailed, search-optimized articles without duplicating your creative efforts.