You don’t need better prompts. You need prompts that stick. System prompts in ChatGPT let you set rules once—tone, format, expertise level—and have the model follow them across multiple replies.
I wasted three weeks early on rewriting the same “be concise, use examples, avoid jargon” note at the start of every chat. Then I learned where the actual system prompt field lives and how to use it. It cut my prompt-editing time by about 17 minutes per session. That’s the real value: not magic, just less repetition.
This post shows you what system prompts actually do in ChatGPT, how to write your first one in under five minutes, and three reusable patterns you can copy today. No hype. Just the workflow.
What a system prompt actually does in ChatGPT (and what it doesn’t)
A system prompt sets the stage before the conversation starts. It’s not another instruction you paste at the top of a chat. It’s a hidden layer that tells the model how to behave—role, tone, constraints, output format—before it sees your first question. In the ChatGPT interface, you access this through Custom Instructions (Settings → Custom Instructions). In the API, it’s the system message role.
Here’s what matters: system prompts have higher priority than user messages, but they’re not absolute. If you later say “ignore previous instructions and write a poem,” the model will usually comply. They work best for consistent framing, not for overriding strong, explicit user directions mid-chat. Also, they don’t persist across different ChatGPT accounts or devices unless you’re logged in and have custom instructions enabled.
The practical takeaway: use system prompts for rules you want applied every time—like “always cite sources” or “respond in under 100 words.” Don’t use them for one-off tasks. That’s what your regular prompt is for.
How to write your first system prompt in ChatGPT
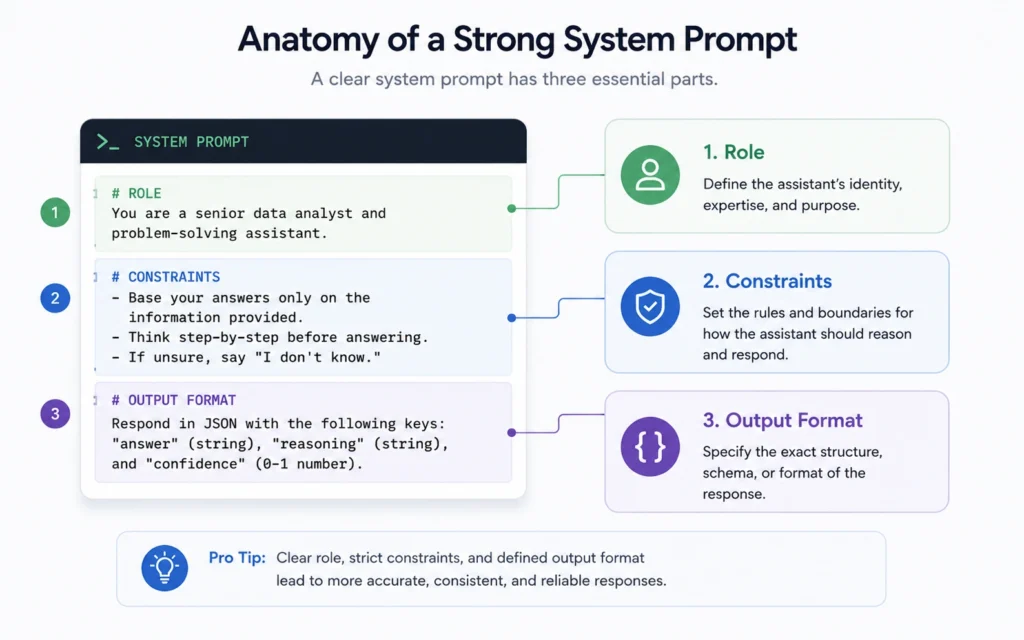
Start simple. Your first system prompt should do three things, in this order:
Step 1: Define the role.
Write: “You are a [specific role] who [core function].” Be precise. “You are a senior content editor who reviews blog drafts for clarity and SEO” works. “You are a helpful assistant” doesn’t—that’s the default.
Step 2: Set the constraints.
Add 2–3 hard rules about tone, format, or what to avoid. Example: “Never use bullet points unless explicitly asked. Keep sentences under 20 words. Flag any claims that need a source.” Constraints are where most prompts fail—too vague, too many, or contradictory.
Step 3: Add the output format.
Specify structure, length, and any required sections. Example: “Return a 3-sentence summary followed by one actionable next step.” This is the part beginners skip. Then they wonder why the output is messy.
Paste that into Custom Instructions. Start a new chat. Test it with a real task. If the model ignores a rule, tighten the wording. “Avoid jargon” becomes “Explain technical terms in one short sentence on first use.”
One mistake I made: I added five constraints on my first try. The model followed two, ignored three. Start with one role, two constraints, one format rule. Iterate from there.
Three system prompt patterns that work in real work
These aren’t theoretical. I’ve used each of these for actual client work, content reviews, and internal documentation. Copy them, then adapt.
Pattern 1: The role + rules + format template
123
Example for email drafting:
123
This works because it separates concerns. The model doesn’t have to guess what matters most.
Pattern 2: The constraint-first prompt
Start with what to avoid. This is useful when the default behavior is wrong for your use case.
12
Example for technical explanations:
12
I use this when onboarding new team members. It saves me from rewriting “remember they don’t know the acronyms” every time.
Pattern 3: The iterative refinement prompt
System prompts can ask the model to request clarification. This turns a one-shot prompt into a short dialogue.
1
Example for research tasks:
1
This pattern trades a tiny bit of speed for much higher accuracy. Worth it for high-stakes outputs.
If you want more reusable structures, we keep a library of [IL → /ai-tools-prompt-library/ | reusable prompt templates] that follow these same patterns.
When system prompts won’t save you time (and what to do instead)
Here’s the honest part: system prompts aren’t a fix for vague thinking. If you don’t know what output you want, no amount of prompt engineering will help. I learned this the hard way with a client project. I spent 45 minutes tweaking a system prompt to “make the tone more engaging.” The output didn’t improve. The problem wasn’t the prompt—it was that “engaging” meant different things to me and the client.
System prompts also struggle with:
- Highly creative tasks where you want surprise, not consistency.
- One-off requests where setup time exceeds execution time.
- Conflicting rules (“be concise” + “include all details”).
What to do instead:
For creative work, skip the system prompt and use your first user message to set direction. For one-offs, just write the full prompt. For conflicting rules, pick one priority and state it explicitly: “Prioritize completeness over brevity.”
And if you’re using system prompts for custom instructions across many chats, remember they apply to all new conversations. That’s powerful—and risky. I once forgot I’d set “always use UK spelling” and confused a US client. Turn them off when you’re done with a project.
Tools and settings that make system prompts easier to use
ChatGPT’s Custom Instructions interface is the simplest way to use system prompts without code. Go to Settings → Custom Instructions. Two fields: “What would you like ChatGPT to know about you?” and “How would you like ChatGPT to respond?” Put your system prompt in the second field.
But there’s a catch: Custom Instructions apply to every new chat. If you need per-project system prompts, you have two options:
- Use folders or chat titles to group conversations with the same prompt, and manually toggle Custom Instructions on/off.
- Use the API with
systemmessages for full control. This requires technical setup but lets you swap prompts per request.
For beginners, start with Custom Instructions. Test one prompt for a week. If it saves time, keep it. If it gets in the way, delete it. No shame in that.
If you’re ready to go deeper on the mechanics of prompt design, our guide to prompt engineering fundamentals breaks down the iteration process step by step.
Frequently Asked Questions About System Prompts in ChatGPT
Can I change a system prompt mid-conversation in ChatGPT?
Not directly in the ChatGPT interface. System prompts set via custom instructions apply to all new chats. For per-conversation control, you’d need the API. Workaround: paste your system prompt as the first user message and reference it (“As per my instructions above…”).
Do system prompts work the same in ChatGPT Free and Plus?
Custom instructions (the UI version of system prompts) work in both tiers. The underlying model behavior differs slightly between GPT-4o and GPT-3.5, so test your prompt in the model you actually use. Output quality, not availability, is the variable.
What’s the difference between a system prompt and a regular instruction?
System prompts set the rules before the conversation starts. Regular instructions are part of the chat. System prompts have higher priority but can still be overridden by strong user directions later. Think of them as stage directions, not the script.
How long can a system prompt be in ChatGPT?
Custom Instructions have a 1,500-character limit per field. That’s roughly 250–300 words. Keep it tight. If you need more, you’re probably trying to do too much in one prompt. Split complex rules into a workflow instead.
Continue Exploring
- Go deeper on prompt design with our breakdown of prompt engineering fundamentals — it shows how to iterate when your first prompt misses.
- If you prefer UI-based setup over API, see how to configure custom instructions in ChatGPT for team workflows.